How To Master Https://create.roblox.com Dashboard Creations: A Comprehensive Guide
Hey there, Roblox creators and aspiring game developers! If you're diving into the world of Roblox game creation, mastering the https://create.roblox.com dashboard is your golden ticket to success. Think of it as the ultimate control center where all your creative dreams come alive. Whether you're building an epic adventure, designing a cool hangout spot, or crafting the next big Roblox hit, understanding this dashboard is crucial. So, buckle up and let's explore how to harness its full potential.
Creating on Roblox isn't just about throwing together a few models and calling it a day. It's about diving deep into the mechanics, understanding the tools, and learning how to use the https://create.roblox.com platform like a pro. This guide will walk you through everything you need to know, from setting up your first project to polishing your final experience. You'll be amazed at what you can achieve with a bit of dedication and the right knowledge.
Let’s not waste any time—let’s jump right into the nitty-gritty details. By the end of this article, you'll have a solid grasp of how to master the Roblox creation dashboard, turning your ideas into fully-fledged experiences. Ready? Let’s get started!
- Chicagos Best Rooftop Dining The Ultimate Guide To Skyhigh Eats
- Roadkill Kpkuang The Untold Story You Need To Know
Understanding the https://create.roblox.com Dashboard
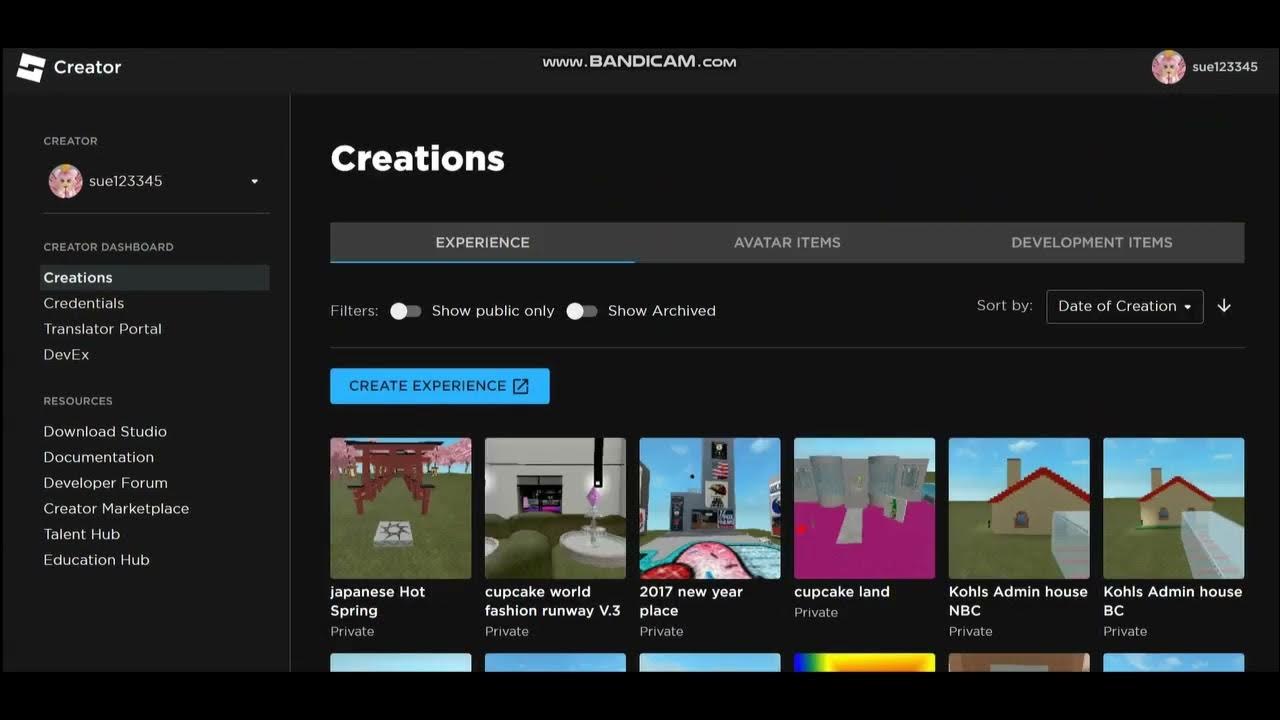
The https://create.roblox.com dashboard is like the heart of your creative journey on Roblox. It’s where you’ll manage all your projects, upload assets, and publish your experiences. Think of it as your personal studio, where every button and feature is designed to help you bring your ideas to life. But before you dive in, it’s essential to understand its layout and functionalities.
Key Features of the Dashboard
Here’s a quick rundown of what you’ll find on the dashboard:
- Projects Section: This is where all your creations live. You can view, edit, and manage your games or experiences from here.
- Assets Library: Need models, textures, or scripts? The assets library has got you covered. It’s a treasure trove of resources ready for you to use.
- Publishing Tools: Once your experience is ready, these tools help you share it with the world. You can tweak settings like visibility, pricing, and more.
- Analytics: Keep track of how your creations are performing. Analytics provide insights into player engagement, traffic, and other important metrics.
Understanding these features will give you a strong foundation as you navigate the dashboard. It’s like learning the rules of the road before you hit the highway.
- How Do Pillsburys Halloween Cookies Compare To Other Brands
- How Old Is Rory In Season 3 A Deep Dive Into The Age Mystery
Setting Up Your First Project
Alright, let’s get practical. The first step to mastering the https://create.roblox.com dashboard is setting up your very first project. This might sound intimidating, but trust me, it’s easier than you think. Here’s a step-by-step guide to help you get started:
Step 1: Accessing the Dashboard
First things first, head over to https://create.roblox.com. Log in with your Roblox account credentials. If you don’t have an account yet, sign up—it’s free! Once you’re logged in, you’ll see the main dashboard interface. Take a moment to familiarize yourself with the layout.
Step 2: Creating a New Experience
Click on the “Create” button and choose “New Experience.” You’ll be prompted to select a template. Templates are pre-built game frameworks that give you a head start. For beginners, I recommend starting with the “Basic” template. It’s simple yet versatile, perfect for learning the ropes.
Step 3: Naming Your Experience
Give your project a name that reflects your vision. Be creative, but also make sure it’s descriptive enough for potential players to understand what your game is about. Remember, this is your first impression, so make it count!
Exploring the Toolbox
Now that you’ve set up your first project, it’s time to explore the toolbox. The toolbox is a collection of tools and resources that help you build and customize your experience. Let’s break it down:
Essential Tools You Need to Know
Here are some of the most important tools you’ll use frequently:
- Modeling Tools: For creating and editing 3D objects. You can resize, rotate, and position models with precision.
- Scripting Editor: If you’re into coding, the scripting editor is where you write Lua scripts to add interactivity to your game.
- Environment Settings: Customize the weather, lighting, and terrain to create the perfect atmosphere for your experience.
These tools are your building blocks. The more you experiment with them, the better you’ll get at using them.
Enhancing Your Experience with Assets
Assets are the lifeblood of any Roblox experience. They include models, textures, sounds, and scripts that make your game pop. The https://create.roblox.com dashboard has an extensive assets library that you can access anytime. Here’s how to make the most out of it:
How to Find the Right Assets
Browsing through the assets library can be overwhelming, especially if you’re new to Roblox. To make it easier, use the search bar and filters to narrow down your options. For example, if you’re looking for a specific type of building, type “house” in the search bar and filter by “models.” You’ll instantly see a list of houses you can choose from.
Customizing Assets
Once you’ve found the perfect asset, don’t be afraid to tweak it. Most assets are customizable, allowing you to change colors, textures, and sizes to fit your vision. This level of flexibility is what makes Roblox so powerful.
Adding Scripts for Interactivity
Scripts are what make your experience interactive. Without scripts, your game would just be a static environment. Lua is the programming language used in Roblox, and learning the basics is essential if you want to add cool features like quests, NPCs, and mini-games.
Getting Started with Lua
If you’re new to coding, don’t worry. Lua is relatively easy to learn, especially for beginners. The Roblox scripting editor comes with helpful tools like syntax highlighting and autocomplete, making the learning curve much smoother. Start with simple scripts, like spawning a particle effect or moving a character, and gradually work your way up to more complex projects.
Publishing Your Experience
Once your experience is ready, it’s time to publish it. Publishing is the final step in bringing your creation to life. Here’s what you need to do:
Step 1: Finalize Your Settings
Before publishing, double-check all your settings. Make sure your experience name, description, and thumbnail are up to date. These elements play a big role in attracting players to your game.
Step 2: Test Your Experience
Testing is crucial. Playtest your game thoroughly to catch any bugs or issues. You can also invite friends to test it out and provide feedback. Their input can be invaluable in improving your experience.
Step 3: Hit the Publish Button
When you’re satisfied with your creation, hit the publish button. Your game will now be live, ready for players around the world to enjoy. Congrats, you’ve officially published your first Roblox experience!
Tracking Performance with Analytics
After publishing, it’s important to track how your experience is performing. The analytics tools on the https://create.roblox.com dashboard provide valuable insights into player behavior, traffic, and engagement. Use this data to refine and improve your game over time.
Key Metrics to Monitor
Here are some key metrics you should keep an eye on:
- Player Count: How many players are playing your game?
- Session Length: How long are players staying in your experience?
- Retention Rate: Are players coming back to play again?
These metrics will help you identify what’s working and what needs improvement.
Tips for Mastering the Dashboard
Mastering the https://create.roblox.com dashboard takes time and practice. Here are some tips to help you along the way:
Tip 1: Experiment and Explore
Don’t be afraid to experiment. The more you explore the dashboard, the more comfortable you’ll become with its features. Try out different templates, assets, and tools to see what works best for you.
Tip 2: Join the Community
The Roblox community is incredibly supportive and full of talented creators. Join forums, Discord servers, and other platforms to connect with fellow creators. You’ll learn a ton from their experiences and gain valuable insights.
Tip 3: Stay Updated
Roblox is constantly evolving, with new features and updates released regularly. Stay updated by following the official Roblox blog and social media channels. You’ll always be in the loop with the latest trends and tools.
Conclusion
And there you have it—a comprehensive guide to mastering the https://create.roblox.com dashboard. From setting up your first project to publishing your experience, you now have all the tools and knowledge you need to succeed. Remember, the key to success in Roblox creation is practice, persistence, and passion.
So, what are you waiting for? Dive into the dashboard, unleash your creativity, and start building your dream experiences. Don’t forget to share your creations with the world and engage with the community. Your journey as a Roblox creator starts now!
Call to Action: Leave a comment below sharing your favorite feature of the https://create.roblox.com dashboard. Also, check out our other articles for more tips and tricks on Roblox game development. Happy creating!
Table of Contents
Understanding the https://create.roblox.com Dashboard
Step 1: Accessing the Dashboard
Step 2: Creating a New Experience
Step 3: Naming Your Experience
Essential Tools You Need to Know
Enhancing Your Experience with Assets
Adding Scripts for Interactivity
Step 1: Finalize Your Settings
Step 3: Hit the Publish Button
Tracking Performance with Analytics
Tips for Mastering the Dashboard
- Nice Cruise Deals Your Ultimate Guide To Affordable Luxury On The High Seas
- Why The Euro Symbol Is More Than Just A Currency Marker
Create.roblox/dashboard/creations Create Roblox Dashboard Creations

Create.roblox/dashboard/creations Create Roblox Dashboard Creations
Create roblox dashboard creations Telegraph
